The documentation provided by Spring on deploying a Spring Boot application as a Windows Service is a little sparse. Indeed, here it is in full:
Spring Boot application can be started as Windows service using
winsw.A sample maintained separately to the core of Spring Boot describes step-by-step how you can create a Windows service for your Spring Boot application.
— From Spring Boot Reference Guide (version 1.4.3), section 56.2: Microsoft Windows Services
As the official reference guide is lacking detail, here is a step by step guide to building and deploying a Spring Boot application as a Windows Service.
Why run as a service?
At the heart of Spring Boot’s ethos is the idea that the application is entirely self-contained. The default packaging builds an executable jar that can be run as
java -jar my-spring-boot-app.jar
The JAR contains an embedded Tomcat server – no external server required. If you have Java installed, you can run Spring Boot. This is fine if you want to run the app interactively from command line but not so good if you want to run it on a production server. In production, you’ll most likely want it to start up automatically when the server starts and automatically restart when it fails. That is, you want to run it as a service. This gives us two options:
- Package the application as a ‘traditional’ web application WAR and deploy into an external Tomcat, running as a service.
- Create a service directly from the executable JAR.
If you already have an existing web server machine with Tomcat installed, option 1 may be best. If you’re on a newly provisioned Windows (or Linux) server, option 2 is likely easier.
An interesting third option is to run the executable JAR in a Docker container. If Docker is available to you, this could be the best choice. For now though, lets assume that the required target environment is Windows Server and that Docker is not available.
Service Wrapper
To run an executable JAR as a Windows service, it must be wrapped as a Windows exe so that Windows can run it natively. A couple of good packages exist for this. One is the Tanuki Java Service Wrapper. I’ve used it before and it’s powerful, reliable and easy to configure. This is available under the GPL v2 licence – great for open source projects and acceptable for internal projects. If your product is proprietary / closed-source, you’ll need to pay for a commercial licence.
An alternative is winsw which has a less restrictive licence. This is the wrapper suggested by Spring and the wrapper I’ve chosen. One drawback with winsw is that it requires the .NET framework (currently v2.0).
Running a JAR as a service
You can grab the winsw exe from the project Jenkins repo. Change the name of the exe to match the service you want installed. I renamed mine to from winsw-1.19.1-bin.exe to windows-service-demo-wrapper.exe. Put this in a directory with your Spring boot application jar. You’ll also want to add any application.properties necessary to configure your app.
The only file you need to create is the winsw config XML file. This should be named to match your renamed executable (windows-service-demo-wrapper.xml to match windows-service-demo-wrapper.exe). This tells winsw what to run as a service. Basic configuration looks like this:
<service>
    <id>windows-service-demo</id>
    <name>Windows Service Demo</name>
    <description>Demo Spring Boot Windows service</description>
    <executable>java</executable>
    <arguments>-jar windows-service-demo.jar</arguments>
</service>
The options set here are:
- id: Identifier of the service. You may need this to start / stop the service from command line
- name: Name of the service as shown in the services.msc snap-in
- description: Description of the service as shown in the services.msc snap-in
- executable / arguments: The executable and arguments to start the service. This reflects how we’d start it from command line: java -jar windows-service-demo.jar
With that in place, open a cmd window as administrator in this directory and type:
windows-service-demo install
All being well, this will install windows-service-demo as a service as shown in the services.msc snap-in:
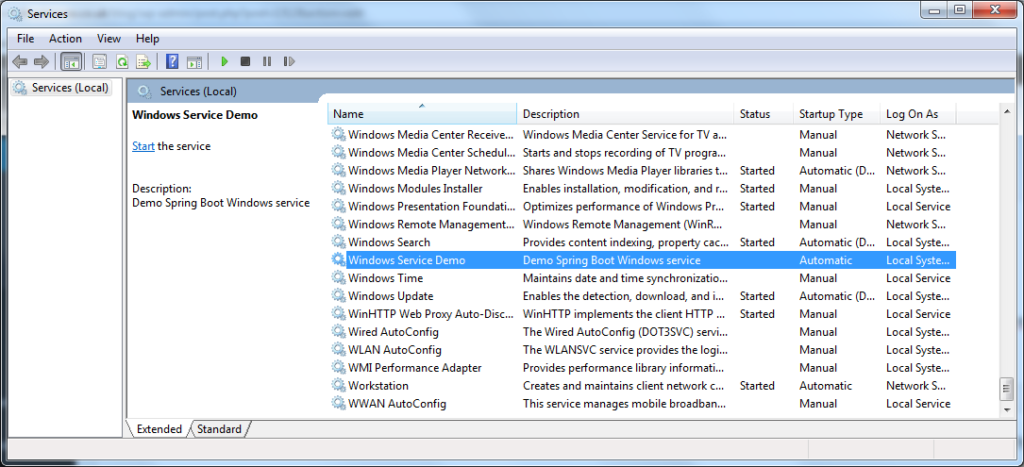
The service is stopped by default so right click on it to start it.
Verify it’s running by opening a browser and navigating to localhost:8080. Log files are created in the directory with the renamed winsw exe.
The service can be uninstalled just as easily:
windows-service-demo uninstall
winsw offers options to configure behavior of the service and the wrapper which can control logging, service account and service startup type. See the config file reference for details.
Packaging the application
The application distribution package now consists of four files:
- Spring Boot executable JAR: the application itself
- application.properties: application configuration (if necessary)
- windows-service-demo-wrapper.exe: the Windows service wrapper (renamed from the original winsw.exe)
- windows-service-demo-wrapper.xml: the winsw service wrapper configuration
We can use Maven bundle these as a distribution using the Maven Assembly Plugin. An example of this is at snicoll-scratches on GitHub.
Here’s a somewhat simplified quick and dirty version. I’ve not bothered pulling winsw as a Maven dependency. I’ve just added the exe to my own source control.
The assembly xml looks like this:
<assembly xmlns="http://maven.apache.org/ASSEMBLY/2.0.0" xmlns:xsi="http://www.w3.org/2001/XMLSchema-instance"
          xsi:schemaLocation="http://maven.apache.org/ASSEMBLY/2.0.0 http://maven.apache.org/xsd/assembly-2.0.0.xsd">
    <id>service</id>
    <formats>
        <format>zip</format>
    </formats>
    <fileSets>
        <!-- Copy in the application JAR -->
        <fileSet>
            <directory>${project.build.directory}</directory>
            <outputDirectory>/</outputDirectory>
            <includes>
                <include>${project.build.finalName}.jar</include>
            </includes>
        </fileSet>
        <!-- Copy in the resources including the wrapper exe and config -->
        <fileSet>
            <directory>${project.basedir}/src/assembly/resources</directory>
            <outputDirectory>/</outputDirectory>
        </fileSet>
    </fileSets>
</assembly>
and is invoked from from the maven-assembly-plugin, bound to the package phase:
<plugin>
	<groupId>org.apache.maven.plugins</groupId>
	<artifactId>maven-assembly-plugin</artifactId>
	<version>3.0.0</version>
	<configuration>
		<descriptors>
			<descriptor>${project.basedir}/src/assembly/service-assembly.xml</descriptor>
		</descriptors>
	</configuration>
	<executions>
		<execution>
			<id>service-assembly</id>
			<phase>package</phase>
			<goals>
				<goal>single</goal>
			</goals>
		</execution>
	</executions>
</plugin>
This working example is in my Github.
Seeing the work you have done, it is still far preferable to run a .war web app under an external Tomcat!
Very efficient and descriptive. Took less than 5 minutes to configure my Spring boot app to run as a Window’s service! Thanks for taking the time to share.
Works very well. Thanks.
But how do you pass arguments like heap size ?
OK just found out:
https://github.com/kohsuke/winsw/blob/master/doc/xmlConfigFile.md
Thanks for the great description, was just looking to refresh my memory on how this was done again and if there are any quick solution.
I knew tanuki from other tools that used it (but remember finding it a bit cumbersome), apparently still used.
Hadn’t heard about winsw which looks pretty elegant. I assume this is how Jenkins2 does it, which I love (right from the web interface, how easy can it be).
However, might be worth listing a 3rd (and in my view the preferred whenever possible ‘because native’) generic solution: just use windows sc.exe (http://support.microsoft.com/kb/251192) if already present on your server.
Hi, when i try to run the service, it appeared the error message 1067: can’t start service. However in the out.log appears the content correctly.
file download functions are not working. any solutions