Spring Cloud Data Flow is a powerful tool for composing and deploying message driven data pipelines. It allows us to compose simple Spring Cloud Stream applications into complex processing pipelines. It also takes care of deploying these pipelines into Kubernetes or into Cloud Foundry.
It’s powerful but has a lot of moving parts. It can be daunting to get a simple pipeline running. This article introduces the Primer demo for SCDF and describes how to deploy it into Kubernetes on a local development machine.
Choose your platform
Spring Cloud Data Flow supports three platforms out of the box:
Local is useful to get something running quickly but it’s not ready for production. In Local mode, SCDF deploys applications directly into the Skipper container. This is not scalable or resilient. One major advantage over Kubernetes though, is that you can deploy your Stream applications directly as executable jars. In Kubernetes, you must package your applications as Docker images.
It’s not much more work to run SCDF on the Kubernetes platform and I’d recommend you start with that. The official documentation is a great guide to creating a cluster and then installing SCDF and your applications using kubectl. It also has a guide if you prefer to use Helm but I’m going to stick with kubectl.
Install Minikube
If you don’t already have a k8s local cluster, Minikube is a good start. I installed it to my Ubuntu 18.04 laptop with the following:
sudo snap install kubectl --classic
kubectl version
curl -LO https://storage.googleapis.com/minikube/releases/latest/minikube_1.6.1.deb \
 && sudo dpkg -i minikube_1.6.1.deb
sudo minikube start --vm-driver=none
sudo chown -R $USER $HOME/.kube $HOME/.minikube
minikube config set memory 4096
minikube config set cpus 2
minikube config set vm-driver virtualbox
minikube delete
sudo minikube start
These lines install kubectl (line 1), and minikube (line 3). We then start Minikube and configure it (line 5-9), then restart it for the config to take effect (line 10-11).
Run the example Spring Cloud Data Flow application
spring.io’s instructions to create the Spring Cloud Data Flow stack are excellent so I won’t repeat them here. You just need to download their k8s yaml files and run them with the kubectl command. They present some choices of how to configure your account. I chose to run Kafka (rather than RabbitMQ) and MySQL. I skipped Prometheus and Grafana – excellent tools but I just want to get going quickly and without too heavy a stack. I also skipped the Apache Kafka Streams Binder.
To summarise the spring.io instructions, I ran these commands:
https://dataflow.spring.io/docs/installation/kubernetes/kubectl/
git clone https://github.com/spring-cloud/spring-cloud-dataflow
cd spring-cloud-dataflow/
git checkout v2.3.0.RELEASE
kubectl create -f src/kubernetes/kafka/
kubectl create -f src/kubernetes/mysql/
kubectl create -f src/kubernetes/server/server-roles.yaml
kubectl create -f src/kubernetes/server/server-rolebinding.yaml
kubectl create -f src/kubernetes/server/service-account.yaml
kubectl create -f src/kubernetes/skipper/skipper-config-kafka.yaml
kubectl create -f src/kubernetes/skipper/skipper-deployment.yaml
kubectl create -f src/kubernetes/skipper/skipper-svc.yaml
kubectl create -f src/kubernetes/server/server-config.yaml
kubectl create -f src/kubernetes/server/server-svc.yaml
kubectl create -f src/kubernetes/server/server-deployment.yaml
Finally, the advice for Minikube users is to change the scdf-server service to NodePort as Minikube does not provide a load balancer. Then find the scdf-server’s IP / port with this command:
minikube service --url scdf-server
https://192.168.99.100:31991
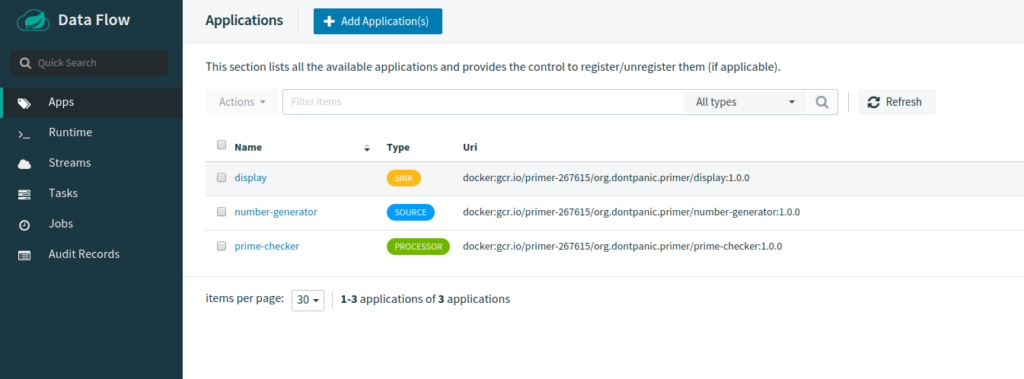
Put the address into a browser to confirm the server is up. It should return JSON. If all is good, try the /dashboard endpoint to see the SCDF graphical dashboard. Lovely!
I made some tweaks to the yaml files, mainly to set resource limits and consolidate the files a little. See the Primer GitHub repo to see what I ended up with. Now, I can start the whole stack with command:
kubectl apply -f k8s/
Deploy Stuff!
The Spring Cloud Data Flow dashboard is good to experiment interactively. You can deploy apps and chain them together into a pipeline. If you want to automate this process however, you’ll want the REST API or the CLI. I want to run a simple script to initialise my pipeline on SCDF startup so I’ve gone for the CLI. In Kubernetes, I created a Job that runs in a spring-cloud-dataflow-server container (it’s not actually running SCDF, it’s just a handy image pre-built with the CLI tools). It loads a shell script that executes SCDF commands. When the job completes, the container stops automatically.
In the scdf-start.yml for the Primer example, it registers the source, processor and sink applications, creates a flow definition from them and then deploys the flow.
app register --type source --name number-generator --uri docker:org.dontpanic.primer/number-generator:1.0.0 --force
app register --type processor --name prime-checker --uri docker:org.dontpanic.primer/prime-checker:1.0.0 --force
app register --type sink --name display --uri docker:org.dontpanic.primer/display:1.0.0 --force
stream create primer --definition "number-generator | prime-checker | display"
stream deploy primer --properties "deployer.display.kubernetes.createNodePort=30000"
There’s a corresponding destroy script which is handy if you want to wipe away your existing flows and start again.
Note that I’m registering Docker images. SCDF in local mode is capable of registering executable jar files – a great feature to get started quickly. Unfortunately the Kubernetes mode does not support this so you’ll need to build your SCDF Spring Boot apps into Docker images. If you’re using Maven, Google’s Jib plugin is a simple way to do this:
<plugin>
  <groupId>com.google.cloud.tools</groupId>
  <artifactId>jib-maven-plugin</artifactId>
  <version>0.10.1</version>
  <configuration>
    <from>
      <image>openjdk:11</image>
    </from>
    <to>
      <image>${docker.prefix}/${project.artifactId}:${docker.version}</image>
    </to>
    <container>
      <useCurrentTimestamp>true</useCurrentTimestamp>
    </container>
  </configuration>
  <executions>
    <execution>
      <id>dockerBuild</id>
      <phase>package</phase>
      <goals>
        <goal>dockerBuild</goal>
      </goals>
    </execution>
  </executions>
</plugin>
What next?
We’ve deployed the Spring Cloud Data Flow server and a flow into Kubernetes Minikube on a local development machine.The advantage of Kubernetes is that the manifest that deployed to local can be reused to deploy to a remote server or to a cloud provider. AWS, Google Compute Engine and Microsoft Azure all have first class support for Kubernetes deployments.
With minimal additional effort, I’ve deployed the same stack to GKE. You can see the Primer application running at http://primer.dontpanicblog.co.uk/ and the full source code on GitHub.
[…] « Spring Cloud Data Flow on Kubernetes […]
Great blog 🙂